Even when our private data doesn’t get sent directly to tech companies, our devices still record our every move locally. Can you name every single web page you visited last month? Your web browser probably can, and so can web trackers that follow your activity across the internet.
In addition to the constant background surveillance that everyone faces, workers with access to sensitive datasets are often under even stricter corporate or government surveillance. Their work computers and phones come preinstalled with spyware that monitors everything they do. Database systems keep track of exactly who searches for which search terms and when, and which documents they open, download, or print.
It’s in this environment that ordinary people find themselves becoming sources. Through the course of their work, they witness something unethical or disturbing. They might make a folder with incriminating documents, or take screenshots of the company chat, or do some searches on internal databases to learn more and make sure their suspicions are correct. They might email themselves some documents or copy files to a USB stick that they plug into their work computer. They might text their friends or family for advice while thinking about what to do next. Most sources aren’t aware of the massive digital trail that they’ve already left by the time they reach out to a journalist or regulator.
In this chapter, you’ll learn about protecting sources and securing the datasets you obtain from them. I’ll go over the editorial and ethical considerations involved in redacting documents and deciding what information to publish, as well as where you should store datasets based on how sensitive they are. I’ll show you how to verify that datasets are authentic, describing how I’ve done so in the past for hacked data from COVID-19 pandemic profiteers and chat logs from WikiLeaks. Verifying the authenticity of datasets is not only important to writing accurate stories but also critical to protecting your reputation as a journalist. Finally, you’ll learn how to use password managers, encrypt disks, and protect yourself from malicious documents.
Safely Communicating with Sources
Because everything we do leaves a data trail, protecting sources is complicated and difficult. After you publish a blockbuster report based on information you’ve obtained from an anonymous whistleblower, you should expect the target of your investigation to launch an investigation of their own into your source’s identity. The balance of power between a confidential source and the investigators on their trail is extremely asymmetric. If you’re a journalist or researcher trying to protect your source, even doing all the right things perfectly isn’t always enough. Because so much of source protection is beyond your control, it’s important to focus on the handful of things that aren’t.
As a journalist or researcher, verifying that data you’ve obtained is authentic is one of your core responsibilities. The simplest way to authenticate documents is to ask the company or government that produced them if they’re real, but this is fraught with risk to your source. In some cases, you don’t want to give up any details that might reveal your source’s identity. I’ll discuss this further in the Authenticating Datasets section later in this chapter. You also might not want to reveal that specific documents have been leaked, a topic you’ll learn more about in this chapter’s Redaction section.
In this section, I’ll describe which sources face risks and which don’t, as well as strategies for reducing those risks. I’ll also discuss the differences between working with confidential sources who have legitimate access to inside information and hackers who break the law to obtain it. It’s important to carefully consider how your own choices as an investigator could impact your source, preferably before you even begin speaking with one.
Working with Public Data
Some datasets don’t pose any risk to the source at all. When the government publishes a set of documents in response to a public records request or when documents are made public as part of a lawsuit, you can include as much of the data as you like in your report. This data might contain revelations that powerful people don’t want anyone to know, but sharing those won’t put anyone at risk of retaliation, since the data is already public.
Similarly, you don’t need to worry about source protection for datasets that may contain sensitive data but are public and widely available, such as the BlueLeaks dataset you’ll download in Chapter 2. Any information you discover from that dataset has already been scoured by the FBI investigators trying to determine who the hacker was. In these cases, it doesn’t matter how many people had access to the documents. There’s no chance of accidentally burning your source by providing too many details to a government or corporate media office when you ask if the data is real and if they have a statement. Since the dataset is already public, any damage to the source has already been done.
Protecting Sensitive Information
If you’re dealing with a dataset from a confidential source, revealing their identity could cause your source to be fired, arrested, or even murdered. The most basic step you should take to protect your source is to simply not talk about them with anyone that isn’t closely collaborating with you on your investigation. Don’t post to social media any details about your source that you’re not planning on making public, don’t talk about them to your friends at parties, and don’t even talk about them to colleagues who aren’t involved in the investigation.
If you’re interviewing a company or government agency about a leaked dataset you’ve obtained, don’t give them any details about your confidential source, even if they directly ask. If you get arrested and the police are demanding to know who your source is, you have the right to remain silent, and you should exercise it: don’t give the police any information they don’t already have. The only time that you’re obligated to reveal information about your source is if a judge orders you to—and even then, you can resist it.
Minimizing the Digital Trail
Be sure to leave the smallest digital trail possible when communicating with your source. As much as you can, avoid communication by email, SMS messages, phone calls, direct messages in social media apps, and so on. Don’t follow your confidential source on social media, and make sure they don’t follow you.
If you must send messages or make calls, use an encrypted messaging app like Signal, which I’ll cover in Chapter 2, and make sure your source deletes any records of their chats with you. You’ll often need to record what your source told you in order to report on it, but take steps to protect those records, such as removing them from messaging apps on your phone and keeping them locally on your computer rather than in a cloud service. If you no longer need your own records of conversations after you’ve published your report—for potential follow-up stories, for example—then delete them.
Make sure your source knows not to search the internet for you or for the reports you’ve published in a way that could be associated with them. Google search history has been used as evidence against sources in the past. For example, in 2018, Treasury Department whistleblower Natalie Mayflower Sours Edwards was indicted for allegedly providing a secret dataset to BuzzFeed journalist Jason Leopold. The documents she was accused of leaking detailed suspicious financial transactions involving Republican Party operatives, senior members of Donald Trump’s 2020 election campaign, and a Kremlin-connected Russian agent and Russian oligarchs. During the leak investigation, the FBI obtained a search warrant to access her internet search history, and her indictment accused her of searching for multiple articles based on the contents of her alleged leaks shortly after they were published.
Working with Hackers and Whistleblowers
The steps you must take to protect your source vary greatly depending on the person’s technical sophistication. Not all sources are whistleblowers, people with inside access to datasets or documents who leak evidence of wrongdoing for ethical reasons. Sometimes your source may be a hacktivist who wants to bring down companies or government agencies that they find unjust.
Unlike most whistleblowers, hackers tend to understand that they’re under surveillance and that everything they do leaves a digital trail, so they usually take countermeasures to hide their tracks. It’s common for whistleblowers to reveal their identities to journalists for verification reasons, even if they aren’t publicly named, but hackers typically remain fully anonymous. However, hackers can often provide technical information you can use to independently authenticate a dataset using open source intelligence. As with any source, you can’t necessarily trust what hackers tell you, but their expertise can help you independently verify that the data they sent you is authentic. For these reasons, there’s often less risk to your source when you publish documents from hackers rather than from whistleblowers.
When communicating with a hacker source, it’s important that you stick to your role as a journalist or researcher. In the US, you’re not breaking any laws just by speaking with a source who’s a hacker, but your source is almost certainly breaking laws by hacking into companies or governments and stealing data. Don’t do anything that could be construed as conspiring with them. For example, don’t ask them to get specific data for you; let them give you whatever data they choose. If you’re a journalist working with an established newsroom, you might fare better against legal threats than a freelancer would. While everyone should be protected equally under the law, newsrooms often have resources like lawyers and defense funds. When you’re not sure whether something you’re doing could get you in trouble, consult a lawyer.
Sometimes sources pretend to be hacktivists or whistleblowers but are actually state-sponsored hackers. For instance, Russian military hackers posed as hacktivists when they compromised the Democratic Party and Hillary Clinton’s presidential campaign in 2016, interfering with the US election by sending hacked datasets to WikiLeaks. This sort of dataset might be authentic and newsworthy, but you don’t want to end up being a pawn in someone else’s information warfare. If you’re unsure about your source’s credibility or believe that they might have ulterior motives—or if you’re confident that they’re being dishonest with you—it’s important to mention your skepticism about your source, and why you have doubts, in your reporting. WikiLeaks did the opposite: it insisted its source wasn’t Russian intelligence when it knew otherwise, and it even spread the conspiracy theory that Seth Rich, a Democratic Party employee who was murdered, was the group’s real source, leading to years of harassment against Rich’s family members.
Secure Storage for Datasets
As you prepare to receive a dataset from a source, first assess how sensitive you think that dataset is, since this will inform how you should go about protecting it, as well as how you’ll continue protecting your source. As mentioned, some datasets are completely public, while others are highly classified national security secrets, and others are somewhere in between. You might encounter a dataset with unique challenges that doesn’t fit into one of these categories, but in general, there are three different levels of sensitivity: low, medium, and high.
Low-Sensitivity Datasets
A dataset might be low sensitivity if it meets one of the following criteria:
- It’s already completely public, such as documents in response to a public records request or public datasets that anyone can download from a transparency collective like Distributed Denial of Secrets. (You’ll learn more about DDoSecrets in Chapter 2.)
- Law enforcement or an adversarial corporation has already gained access to the dataset, meaning how you store it won’t lead to retaliation against your source.
- It doesn’t contain personal identifiable information, or PII, which I describe in detail in the Redaction section on page 14.
Basically, if you can’t think of any harm that would result if a given dataset is shared more widely than you intended, including with law enforcement or leak investigators, it’s probably low sensitivity.
It’s safe to work with low-sensitivity datasets in the cloud, by which I mean storage services like Google Drive, iCloud, and Dropbox; hosting services like Amazon Web Services (AWS); and any other service where anyone besides you and the people you’re working with will have access to the data. Cloud services are all vulnerable to legal requests, however, so if you’re investigating governments or corporations with powerful lawyers, they can send subpoenas to cloud providers to get data associated with your account. Additionally, the data you store in the cloud is only as safe as your account itself. Make sure you have a strong password and turn on features like two-factor authentication to make your account significantly more difficult to hack.
Medium-Sensitivity Datasets
Most datasets that aren’t low sensitivity are medium sensitivity; that is, they’re not already public, but securing them doesn’t require you to go to extreme measures. For example, a dataset I describe later in this chapter that includes medical records of hundreds of thousands of patients is medium sensitivity. These datasets should be stored on disks that are encrypted, or locked in such a way that only the owner should be able to unlock them to access the data. This way, if your laptop is stolen, lost, or seized in a police raid, no one can access your files. If you haven’t already encrypted your disk, you’ll do so in Exercises 1-1 and 1-2.
Medium-sensitivity data should also stay on your computer’s hard disk or a removable disk. Avoid storing it in cloud services unless you have a good reason to do so or you’re able to encrypt it in way that the cloud service can’t decrypt it. Storing datasets on local encrypted disks greatly reduces the risk of anyone else gaining unauthorized access to them.
You can work with medium-sensitivity data on your typical work computer, as long as you secure your machine. Here’s how:
- Make sure your computer’s hard disk is encrypted.
- Take steps to protect your computer physically. Make sure the screen locks automatically after a short amount of inactivity and requires a password to unlock.
- Install software updates promptly, and be wary of what programs you install and what documents you open on your computer. If you accidentally run malicious software or open a malicious document, someone could hack your computer and gain access to your datasets.
- Store the dataset on an external USB disk, which allows you to store more data than will fit on your computer and means you can travel with your laptop without worrying about protecting the datasets stored on it. Make sure your external disk is encrypted as well (see the Disk Encryption section on page 21 for instructions).
- Don’t store files in parts of your computer that are automatically uploaded to the cloud. For example, many Mac users configure their computers to upload their Documents folder to iCloud, Apple’s cloud storage service. If your computer is set up this way, don’t put files related to these investigations in that folder.
In general, work with medium-security data locally, meaning as files stored on your hard disk that aren’t exposed to any online services. In some cases it’s reasonable to work with medium-security datasets remotely. If you’re working with other people, you may need to use an encrypted file-sharing solution so that the service you’re using can’t decrypt the files, but you and your colleagues can. One simple option is to send files back and forth using the Signal messenger app. And if you or your organization is hosting a secure tool for searching datasets, such as Aleph (covered in Chapter 5), it’s also reasonable to copy the data into that tool.
All of the datasets you’ll be working with in this book are low sensitivity, since they’re already public. The techniques you’ll learn throughout the book will apply for medium-sensitivity datasets as well, however, as you’ll work with the data locally on your computer. While it’s fine to work with these particular datasets in the cloud, learning to work with them locally will give you the practice you need for handling more sensitive datasets.
High-Sensitivity Datasets
High-sensitivity datasets are by far the most difficult to work with, for good reason. The Snowden Archive, for example, is high sensitivity. I spent years reporting on this massive trove of secret government documents from National Security Agency (NSA) whistleblower Edward Snowden, who exposed the fact that US and allied spy agencies were conducting warrantless surveillance and privacy invasions on an unimaginable scale. We didn’t want the FBI or NSA to gain access to it, which made cloud services out of the question, but more important, we didn’t want foreign intelligence services to access it either. We assumed that nation-state attackers had the capability to remotely hack pretty much any computer we used unless we took steps to make sure it never connected to any remote network.
Going into detail on how to conduct high-sensitivity investigations is beyond the scope of this book, and you won’t need such skills to work through later chapters. However, for future reference, this section outlines how you should proceed if you find yourself working with a cache of top-secret documents.
If a dataset is high sensitivity, until you are close to publishing your report, store it or access it only using air-gapped computers—those that never connect to the internet. Move files off the air-gapped computer only when they’re already redacted and necessary for publishing. In short, buy a new computer, never connect it to the internet, and use that. Or, if you have an old computer that would work, you can format its disk, reinstall the operating system, and use that computer while never connecting it to the internet. These steps will help you ensure that you’re starting from a clean system free of existing trackers or malware. To make it even more secure, unscrew the computer’s case and physically remove the wireless hardware.
You’ll run into all sorts of challenges related to moving data between your air-gapped computer and your normal work computer—for example, installing or updating software on your air-gapped computer requires downloading it on another computer, carefully verifying that it’s legitimate software, and then transferring it to your air-gapped computer to install it. The extra steps are worth it, though, when a breach might have severe consequences.
It’s also important that the disk in your air-gapped computer and any USB disks that you use with it are encrypted with strong passphrases. Also consider the physical security of where you store your air-gapped computer and USB disks. If possible, keep them in a safe or vault with a good lock. If that’s not possible, at least keep them in a locked room to which few people have keys. Always power off your air-gapped computer when you’re not using it to make it harder for attacks against the disk encryption to work.
When working on air-gapped computers, be mindful of nearby internet-connected electronic devices with microphones or cameras. Avoid having conversations related to highly sensitive documents within earshot of microphones, and consider whether any nearby cameras (including smartphones) could capture photographs of your screen.
Authenticating Datasets
You can’t believe everything you read on the internet, and juicy documents or datasets that anonymous people send you are no exception. Disinformation is prevalent. It’s important to explain in your published report, at least briefly, what makes you confident in the data. If you can’t authenticate it but still want to publish your report in case it’s real—or in case others can authenticate it—make that clear. When in doubt, err on the side of transparency.
How you go about verifying that a dataset is authentic completely depends on what the data is. You have to approach the problem on a case-by-case basis. The best way to verify a dataset is to use open source intelligence (OSINT), or publicly available information that anyone with enough skill can find. This might mean scouring social media accounts, consulting the Internet Archive’s Wayback Machine (https://web.archive.org), inspecting metadata of public images or documents, paying services for historical domain name registration data, or viewing other types of public records. If your dataset includes a database taken from a website, for instance, you might be able to compare information in that database with publicly available information on the website itself to confirm that they match.
This book’s discussion of OSINT focuses on how I’ve used it in my own investigations. If you want to learn more, see Michael Bazzell’s OSINT Techniques: Resources for Uncovering Online Information, along with the companion tools listed at https://inteltechniques.com/tools. Bazzell describes a large number of tools and techniques for discovering details that might help you verify datasets using OSINT.
In this section, I’ll share two examples of authenticating data from my own experience: one about a dataset from the anti-vaccine group America’s Frontline Doctors, and another about leaked chat logs from a WikiLeaks Twitter group.
NOTE: In 2023, Twitter rebranded itself as X. In this book, I will continue to refer to accounts and posts that existed before this rebranding as “Twitter accounts” and “tweets.”
The AFLDS Dataset
In late 2021, in the midst of the COVID-19 pandemic, an anonymous hacker sent me hundreds of thousands of patient and prescription records from telehealth companies working with America’s Frontline Doctors (AFLDS). AFLDS is a far-right anti-vaccine group that misleads people about COVID-19 vaccine safety and tricks patients into paying millions of dollars for drugs like ivermectin and hydroxychloroquine, which are ineffective at preventing or treating the virus. The group was initially formed to help Donald Trump’s 2020 reelection campaign, and the group’s leader, Simone Gold, was arrested for storming the US Capitol on January 6, 2021. In 2022, she served two months in prison for her role in the attack.
My source told me that they got the data by writing a program that made thousands of web requests to a website run by one of the telehealth companies, Cadence Health. Each request returned data about a different patient. To see whether that was true, I made an account on the Cadence Health website myself. Everything looked legitimate to me. The information I had about each of the 255,000 patients was the exact information I was asked to provide when I created my account on the service, and various category names and IDs in the dataset matched what I could see on the website. But how could I be confident that the patient data itself was real, that these people weren’t just made up?
I wrote a simple Python script to loop through the 72,000 patients (those who had paid for fake health care) and put each of their email addresses in a text file. I then cross-referenced these email addresses with a totally separate dataset containing PII from members of Gab, a social network popular among fascists, anti-democracy activists, and anti-vaxxers. In early 2021, a hacktivist who went by the name “JaXpArO and My Little Anonymous Revival Project” had hacked Gab and made off with 65GB of data, including about 38,000 Gab users’ email addresses. Thinking there might be overlap between AFLDS and Gab users, I wrote another simple Python program that compared the email addresses from each group and showed me all of the addresses that were in both lists. There were several.
Armed with this information, I started scouring the public Gab timelines of users whose email addresses had appeared in both datasets, looking for posts about AFLDS. Using this technique, I found multiple AFLDS patients who posted about their experience on Gab, leading me to believe that the data was authentic. For example, according to consultation notes from the hacked dataset, one patient created an account on the telehealth site and four days later had a telehealth consultation. About a month after that, they posted to Gab saying, “Front line doctors finally came through with HCQ/Zinc delivery” (HCQ is an abbreviation for hydroxychloroquine).
Chapter 13 focuses entirely on my AFLDS investigation and describes the technical details of my Python script in greater depth. By the time you’ve worked through the intervening chapters, you’ll have the Python knowledge to understand how that script worked.
The WikiLeaks Twitter Group Chat
In late 2017, journalist Julia Ioffe published a revelation in the Atlantic: WikiLeaks had slid into Donald Trump Jr.’s Twitter direct messages (DMs). Among other things, before the 2016 election, WikiLeaks suggested to Trump Jr. that even if his father lost the election, he shouldn’t concede. “Hi Don,” the verified @WikiLeaks Twitter account wrote, “if your father ‘loses’ we think it is much more interesting if he DOES NOT conceed [sic] and spends time CHALLENGING the media and other types of rigging that occurred—as he has implied that he might do.”
A long-term WikiLeaks volunteer who went by the pseudonym Hazelpress started a private Twitter group with WikiLeaks and its biggest supporters in mid-2015. After watching the group become more right-wing, conspiratorial, and unethical, and specifically after learning about WikiLeaks’ secret DMs with Trump Jr., Hazelpress decided to blow the whistle on the whistleblowing group itself. She has since publicly come forward as Mary-Emma Holly, an artist who spent years as a volunteer legal researcher for WikiLeaks.
To carry out the WikiLeaks leak, Holly logged in to her Twitter account, made it private, unfollowed everyone, and deleted all of her tweets. She also deleted all of her DMs except for the private WikiLeaks Twitter group and changed her Twitter username. Using the Firefox web browser, she then went to the DM conversation—which contained 11,000 messages and had been going on for two and a half years—and saw the latest messages in the group. She scrolled up, waited for Twitter to load more messages, scrolled up again, and kept doing this for four hours, until she reached the very first message in the group. She then used Firefox’s Save Page As function to save an HTML version of the web page, as well as a folder full of resources like images that were posted in the group.
Now that she had a local, offline copy of all the messages in the DM group, Holly leaked it to the media. In early 2018, she sent a Signal message to the phone number listed on The Intercept’s tips page. At that time, I happened to be the one checking Signal for incoming tips. Using OnionShare—software that I developed for this purpose, which I describe in detail in Chapter 2—she sent me an encrypted and compressed file, along with the password to decrypt it. After extracting it, I found a 37MB HTML file—so big that it made my web browser unresponsive when I tried opening it, and which I later split into separate files to make it easier to work with—and a folder with 82MB of resources.
How could I verify the authenticity of such a huge HTML file? If I could somehow access the same data directly from Twitter’s servers, that would do it; only an insider at Twitter would be in a position to create fake DMs that show up on Twitter’s website, and even that would be extremely challenging. When I explained this to Holly (who, at the time, I still knew only as Hazelpress), she gave me her Twitter username and password. She had already deleted all the other information from that account. With her consent, I logged in to Twitter with her credentials, went to her DMs, and found the Twitter group in question. It immediately looked like it contained the same messages as the HTML file, and I confirmed that the verified account @WikiLeaks frequently posted to the group.
Following these steps made me extremely confident in the authenticity of the dataset, but I decided to take verification one step further. Could I download a separate copy of the Twitter group myself in order to compare it with the version Holly had sent me? I searched around and found DMArchiver, a Python program that could do just that. Using this program, along with Holly’s username and password, I downloaded a text version of all of the DMs in the Twitter group. It took only a few minutes to run this tool, rather than four hours of scrolling up in a web browser.
NOTE After this investigation, the DMArchiver program stopped working due to changes on Twitter’s end, and today the project is abandoned. However, if you’re faced with a similar challenge in a future investigation, search for a tool that might work for you. You could also consider developing your own, using programming skills that you’ll learn in Chapters 7 and 8.
The output from DMArchiver, a 1.7MB text file, was much easier to work with compared to the enormous HTML file, and it also included exact timestamps. Here’s a snippet of the text version:
[2015-11-19 13:46:39] <WikiLeaks> We believe it would be much better for GOP to win.
[2015-11-19 13:47:28] <WikiLeaks> Dems+Media+liberals woudl then form a block to reign in their worst qualities.
[2015-11-19 13:48:22] <WikiLeaks> With Hillary in charge, GOP will be pushing for her worst qualities., dems+media+neoliberals will be mute.
[2015-11-19 13:50:18] <WikiLeaks> She's a bright, well connected, sadistic sociopath.
I could view the HTML version in a web browser to see it exactly as it had originally looked on Twitter, which was also useful for taking screenshots to include in our final report, as shown in Figure 1-1.

Figure 1-1: A screenshot of the leaked HTML file
Along with the talented reporter Cora Currier, I started the long process of reading all 11,000 chat messages, paying closest attention to the 10 percent of them from the @WikiLeaks account—which was presumably controlled by Julian Assange, WikiLeaks’ editor—and picking out everything in the public interest. We discovered the following details:
- Assange expressed a desire for Republicans to win the 2016 presidential election.
- Assange and his supporters were intensely focused on discrediting two Swedish women who had accused him of rape and molestation, as well as discrediting their lawyers. Assange and his defenders spent weeks discussing ways to sabotage articles about his rape case that feminist journalists were writing.
- Assange tried to discredit filmmaker Laura Poitras because of how she portrayed him in Risk, the 2016 documentary about WikiLeaks. The film includes a scene in which Assange tells his lawyer that his accusers were part of a “thoroughly tawdry radical feminist political positioning thing,” and in another scene he says, “Part of the problem in this case is there’s two women, and the public just can’t even keep them separate. If there was one, you could go, ‘She’s a bad woman.’ I think that would have happened by now.”
- Assange used transphobic and misogynistic language when talking about Chelsea Manning, his source from 2010, and her friends. I discuss Manning’s relationship with WikiLeaks further in Chapter 2.
- After Associated Press journalist Raphael Satter wrote a story about harm caused when WikiLeaks publishes personal identifiable information, Assange called him a “rat” and said that, “he’s Jewish and engaged in the ((())) issue,” referring to an antisemitic neo-Nazi meme. He then told his supporters to “Bog him down. Get him to show his bias.”
You can read our reporting on this dataset at https://theintercept.com/2018/02/14/julian-assange-wikileaks-election-clinton-trump/. After The Intercept published this article, Assange and his supporters also targeted me personally with antisemitic abuse, and Russia Today, the state-run TV station, ran a segment about me. I discuss WikiLeaks and its history in greater depth in Chapter 2.
The techniques you can use to authenticate datasets vary greatly depending on the situation. Sometimes you can rely on OSINT, sometimes you can rely on help from your source, and sometimes you’ll need to come up with an entirely different method.
Redaction
Once you’ve authenticated your dataset, you must consider whether or how you want to redact—that is, hide or delete—sensitive information before publishing the results of your investigation. In some cases it might be safe to publish original documents without any redaction, and in others you might choose not to publish any documents at all. In this section I’ll discuss how to make these decisions and the reasons you might choose to redact, or not redact, information.
What Data to Publish
When deciding how much data to publish, consider whether your method of reporting the revelations will enable leak investigators to uncover your source. For example, if a company’s human resources department sends an email to all of its 10,000 employees and one of them leaks the message to you, it will be very hard for the company to find the culprit. But if only 10 people have access to a document—or database logs show a list of 10 people who recently accessed it—the company has a real suspect list to work from.
How many people had access to the data you’ve obtained, how sensitive it is, what your source is risking, and what they’re comfortable with are all factors that will determine the different types or quantities of data you publish. The following list provides options to consider, ordered from the most risk to your source to the least:
- Publish unaltered documents or datasets.
- Publish documents after you’ve redacted them and stripped them of metadata.
- Publish documents after re-creating them from scratch by typing them by hand into new separate documents and publishing those instead. When you re-create documents, you remove any hidden trackers and make it impossible to tell from the documents themselves whether your source obtained them by photographing their screen, copying them to a USB stick, uploading them to a website, or using some other method.
- Don’t publish the documents at all; only describe and quote from them.
- Don’t even quote from the documents, just describe the revelations they contain. If leak investigators don’t know what documents were compromised, only that an accurate news story somehow reveals confidential information, they’ll have a harder time making progress in their investigation.
Publishing documents is more transparent to your readers, and providing direct evidence makes your work more credible, but doing so has to be weighed against protecting your source. You’ll make these decisions on a case-by-case basis, but always keep in mind the risks that your source faces.
What to Redact
If you’ve carefully considered the risks to your source and decided to publish documents rather than just describing them, the next step is to decide what, if any, information in those documents to redact before publishing. There are three reasons for redaction: to continue protecting your source, to protect the privacy of others involved, or to protect government or corporate information that should justifiably remain secret.
Protecting Your Source
If your dataset includes archives of a private website or databases that your source was logged in to, you’ll want to redact their username or any other identifying information before publishing. In addition, make sure you don’t accidentally publish metadata that could reveal your source. This book won’t describe the many ways that could happen, but here are two common examples: Word documents often include the name of the author, and photos often include GPS coordinates and the type of camera that was used.
In 2012, John McAfee, the controversial millionaire software executive, was on the run. Police raided his home in Belize, and he fled the country. In a blog post, he wrote, “I am currently safe and in the company of two intrepid journalist [sic] from Vice Magazine … We are not in Belize, but not quite out of the woods yet.” That day, Vice published its article about McAfee, which included a photograph. According to the photo’s metadata, it was taken on an iPhone 4S and included GPS coordinates to a specific house in Guatemala. By not stripping the photo of metadata, Vice accidentally published his exact location. If Vice had simply taken a screenshot of the image and published that instead, the magazine would have erased the metadata and kept the location secret.
In 2017, when President Donald Trump constantly called the accusations that Russia interfered in the US elections “fake news,” NSA whistleblower Reality Winner anonymously mailed a top-secret document to The Intercept with evidence that the NSA had, in fact, witnessed a Russian cyberattack against local election officials. The Intercept published the document, and a short time later Reality Winner was arrested. The published document included a type of metadata called printer dots, nearly invisible yellow dots that printers add to paper that include the serial number of the printer and the timestamp of when it was printed. While there’s no evidence that leak investigators even noticed them until after Reality Winner was arrested (she was one of six people who had printed this document, and the only one who had written an email to The Intercept), the printer dots could have outed her as well. The Intercept could have mitigated this by re-creating the document (retyping it and re-creating the artwork) and publishing that instead of a scanned version of the original.
Protecting Personal Information in Datasets
Many datasets include names, email addresses, usernames, phone numbers, home addresses, passwords, and other similar personal identifiable information of people who aren’t public figures. Many government and corporate documents include PII for random employees that won’t add anything to your story but could make these people targets of harassment. Even when dealing with public figures, in most cases it’s still responsible to redact their PII unless publishing it adds value to your report. For example, if the focus of your investigation is a lavish mansion owned by a billionaire, it might be reasonable to publish the address of that mansion. If you’re writing an unrelated story about that billionaire, however, there’s no reason to include their home address.
Even if you believe the targets of your investigation are jerks, it’s better to redact their PII if including it doesn’t add to your report. Even jerks have privacy rights, and needlessly publishing PII could be used to discredit your report regardless of the revelations it contains.
The exception to this rule is if publicly outing someone is an important part of your story and could keep other people safe. For example, it’s ethical to name someone who is abusive in a workplace or industry or to out someone as a member of a hate group. Even when you’re publicly outing someone, though, don’t publish unnecessary PII about them, like their home address. If you do, you might be accused of harassment, which could distract the conversation from the wrongdoing you’re trying to expose.
Protecting Legitimate Secrets
Occasionally, governments and companies do in fact have legitimate reasons to keep secrets. In my experience, this is rare—the US government has a severe overclassification problem. This is one reason it’s important to ask related parties for comment before you publish your story, though: a government agency or company may give you context that could make you decide not to publicize the data. For example, I was once part of a decision to redact details from a top-secret US government document related to another country’s nuclear weapons program.
Making Requests for Comment
Always give the people or companies on which you’re reporting a chance to tell their side of the story. Even if you’re confident that they won’t respond truthfully or at all, you should still attempt to contact them, explain what you’re going to publish, and give them a chance to defend themselves. If they do respond, quote their response in your published report (and if you know they aren’t telling the truth, explain that alongside their quote). If they don’t respond or they decline to comment, include that in your report as well.
For example, in 2017, I reported on leaked chat logs from neo-Nazis, which I cover in Chapter 14. In my article, I named a member of the pro-slavery hate group League of the South who was arrested during the deadly Charlottesville, Virginia, Unite the Right protest for carrying a concealed handgun. He had posted messages in a chatroom saying that he had “scores to settle” with local antifascists because they had gotten him fired from his job. Using public records, I tracked down his phone number. I set up a new virtual phone number using Google Voice and called him with that, since I didn’t want to give him my private number. I left messages, but he never responded.
If your investigation is adversarial—that is, the people you’re looking into aren’t going to be happy about it—wait until shortly before you publish your report to contact them and tip your hand. It’s polite to give them at least 24 hours to respond, while giving them less time to sabotage your story. They might leak your story to a friendly publication to publish first with a positive spin, announce to their followers that a hit piece is coming, or attempt to use legal means to stop you from publishing. I’ve been involved in investigations where all of those scenarios have happened.
Chances are, you’re not an expert in all aspects of what you’re reporting on, so it’s often a good idea to consult outside experts (university professors, authors, scientists, and so on) and include quotes from them in your published reports. In my own reporting, I’ve interviewed cryptography professors, disinformation researchers, medical doctors, and civil rights advocates who work for nonprofits. Even if you’re an expert on the topic of your investigation, providing outside voices often adds to your story, helping you make stronger arguments.
As long as you trust the experts you’re talking with, it’s fine to contact them early in the reporting process. It’s also common to share confidential documents with them, so long as they agree to keep them secret until you publish. In the case of highly sensitive documents, you might need to arrange for outside experts to visit you in person and view the files on your air-gapped computer. Sometimes these experts can point you in research directions that you wouldn’t think to go yourself.
Now that you’ve seen how to protect your sources and authenticate the information they give you, let’s go over some ways to secure your computer and online accounts to keep your datasets and other sensitive records safe.
Password Managers
Most people’s passwords aren’t unique, meaning they’re reused in multiple places. This is a very bad idea, since any duplicate password is only as secure as the least secure place you’ve used it. Go to https://haveibeenpwned.com, search for your email address or phone number, and you’ll see a list of data breaches that you’re included in. If your LinkedIn password was exposed in a data breach a few years ago but it’s the same password you use for your Gmail account, to log in to your laptop, or to unlock your encrypted USB disk full of sensitive datasets, you may be in trouble.
The solution is to make all your passwords unique as well as strong, which really just means long and random enough that they’re impossible to predict. Unfortunately, strong passwords are hard to memorize, and it’s impossible for humans to memorize hundreds of passwords that are both strong and unique. Yet we’re required to use hundreds of passwords in our daily lives.
Fortunately, we can have computers memorize most of our passwords for us. Password managers are programs that keep track of an encrypted database of passwords that you unlock using a master password, the only one you have to memorize. Password managers often allow you to sync your password database to the cloud, which is fine so long as you’re using a strong master password. If a hacker steals your encrypted password database or if your password manager company hands it to the FBI or other authorities, they won’t be able to unlock it without your master password. An encrypted password database is completely inaccessible to anyone without the master password. If your master password is strong, it will be literally impossible for them to guess it, and your other passwords will be safe. Encryption is cool like that.
DONALD TRUMP’S TWITTER PASSWORD
I learned from an episode of the excellent podcast Darknet Diaries, hosted by Jack Rhysider, that Donald Trump’s LinkedIn password was exposed in a 2012 data breach. His password,
yourefired, was his signature phrase from The Apprentice, the reality TV show he hosted. While he was running for president in 2016, three Dutch hackers, Victor, Edwin, and Matt, who are part of a group called the Guild of the Grumpy Old Hackers, discovered his LinkedIn password in the dataset from that breach. They tried it on Trump’s @realDonaldTrump Twitter account and … it worked.
You might be thinking, “Isn’t using a password manager just putting all my eggs in one basket? If it gets hacked, doesn’t that give the hacker access to everything?” This is true—it’s very important to secure your password manager—but not using one at all is like trying to hold hundreds of eggs with just your hands, without using a basket, and without breaking any of them. If you try that, you’re bound to drop a lot of your eggs eventually. You also always have the option of using multiple password managers (multiple baskets) for different projects so that if one gets hacked, the others remain secure.
There are several good password managers available, and if you already know of one you like, by all means use it. Here are three that I recommend:
Bitwarden This manager is free and open source, and it syncs passwords between your computers and phone. It has browser extensions to fill in passwords automatically when you log in to websites. It’s a good choice for a day-to-day password manager. Download it at https://bitwarden.com.
1Password Like Bitwarden, 1Password syncs passwords between your computer and phone and has a browser extension. It’s also a good choice for a day-to-day password manager. It costs money, but 1Password gives free licenses to journalists. Download it at https://1password.com, or see https://1password.com/for-journalism/ for more information about the free license program.
KeePassXC This software is great for high-security situations. Unlike Bitwarden and 1Password, KeePassXC doesn’t sync your encrypted password database to the cloud, which makes it less convenient but potentially more secure. It works well on air-gapped computers. Download it at https://keepassxc.org.
If you’d like to use Bitwarden, 1Password, or a similar password manager that syncs between devices, follow the installation instructions on its website to install the program on your computer, on your phone, and as an extension in your web browser. If you’re using a local-only password manager like KeePassXC, just install it on your computer.
When you first set up your password manager, it’s extremely important that you not forget your master password. Unlike most website passwords, a master password can’t be reset. If you forget it, you’re locked out of your password manager forever and you lose all your passwords. Write the master password on a piece of paper until you’ve memorized it, and then destroy the paper.
The best master passwords are passphrases, a sequence of words picked at random from a dictionary. They’re also easier to remember than completely random passwords. An example of a good passphrase is movie-flanked-census6-casino-change. It has no meaning at all, but with practice it’s not too hard to memorize.
Once you’ve set up your password manager account, add your other passwords to the manager. Start by adding the passwords you use the most: perhaps your email password or passwords to social media accounts. If you’ve ever reused these passwords, take this opportunity to change them and make them better. Whenever you create a new password, use your password manager’s password generator, a tool included to help you create strong passwords. Typically, password generators have settings that let you choose whether it should generate a password or a passphrase, whether it should contain numbers or special characters, how long it should be, and so on.
Bitwarden, for example, can create both passwords or passphrases. Figure 1-2 shows Bitwarden’s password generator, which is configured to create a passphrase with five words, separated by dashes, capitalized, and including a number.
Bitwarden can also make strong passwords, such as Frz6ioX4o@cCY. All of your passwords should either be strong passphrases or passwords like this.
The password generators included in 1Password, KeePassXC, and other password managers all include similar features. While Bitwarden allows you to open the password generator tool independently, some password managers require you to add a new item in your password database or edit an existing one to access the generator.
When you need to come up with a new password, it doesn’t matter if you choose to use a password or a passphrase so long as it’s strong and unique. However, passphrases tend to be easier to memorize and to enter. For this reason, I tend to use passwords to log in to websites (my password manager fills them in for me) and passphrases for anything that I might need to memorize or enter, such as a disk encryption passphrase or the passphrase to log in to my computer.
Every time you create a new account or log in to an existing one, add the password to your password manager.
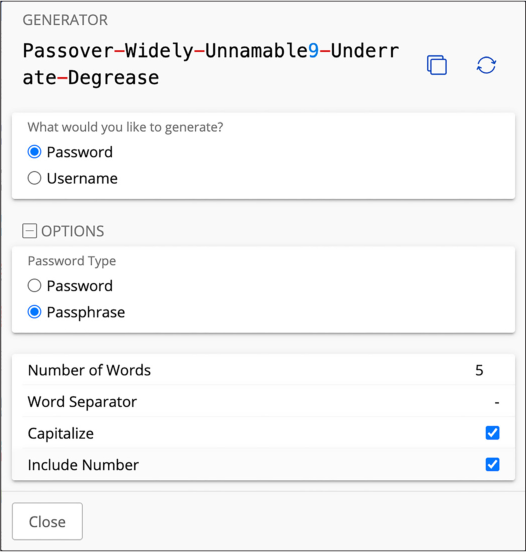
Figure 1-2: Bitwarden’s password generator
Disk Encryption
Disk encryption allows you to protect your data from people who have physical access to your phone, laptop, or USB disk. It prevents anyone from accessing data on a device if you lose it, someone steals it, it gets confiscated at a border crossing or checkpoint, or your home or office is raided. For example, when the internal disk in your laptop isn’t encrypted, anyone with physical access to it can unscrew your laptop’s case, remove the disk, and plug it into their own computer, accessing all of the data without needing to know any of your passwords. But when your disk is encrypted, all of this data is completely inaccessible to anyone who doesn’t have the right key. If disk encryption is enabled, they’ll need to first unlock the disk, typically using a password, a PIN, or biometrics like a fingerprint or face scan. You’ll learn how to encrypt your internal disk and your 1TB USB disk in this chapter’s exercises.
Although disk encryption is an important part of protecting your data, it doesn’t protect against remote attacks. For example, if your laptop is encrypted but someone tricks you into opening a malicious Word document that attacks your computer, disk encryption won’t stop them from accessing your files. Disk encryption also won’t help much if the attackers get access to your device while it’s unlocked—for example, if you step away from your laptop at a coffee shop without locking your screen or if attackers can easily unlock your phone by forcing you to use biometrics. For instance, after arresting you, a cop might wave your phone in front of your face to unlock it with a face scan.
You, of course, won’t be relying on disk encryption to commit crimes, but the story of Ross Ulbricht, the creator of the darknet market website Silk Road, is a good illustration of how it can fail you. In 2013, Ulbricht was using his encrypted laptop at the San Francisco Public Library when two undercover FBI agents distracted him by pretending to be lovers in a fight. Making sure his screen was unlocked, they quickly arrested him, then copied important files off of his computer. If his screen had been locked and he’d had a strong password, the disk encryption might have prevented them from accessing his data at all. Ulbricht was charged with money laundering, hacking, drug trafficking, and other crimes.
Encrypting your laptop’s internal disk is a basic security measure that everyone should take. It’s quick and easy to set up, doesn’t require you to do any extra work on a regular basis, and protects your privacy if you lose your device. You can think of it like wearing a seatbelt: there’s really no good reason not to do it. Encrypting your laptop’s internal disk is especially important if you’re going to be working with sensitive data.
Exercise 1-1: Encrypt Your Internal Disk
This exercise shows you how to encrypt the internal disk in your computer, whether you have a Windows, Mac, or Linux machine. Skip to the appropriate section for your operating system.
Windows
Different Windows versions and PC models have support for different types of disk encryption. Pro editions of Windows include BitLocker, Microsoft’s disk encryption technology, and Home editions include device encryption, which is basically BitLocker with limited features. These features work only if your PC is new enough, though. If your computer came with at least Windows 10 when it was new, it should support disk encryption, but if it came with an earlier version of Windows, it might not. I go over options for how to proceed in this case at the end of this section.
BitLocker
To find out whether your computer includes BitLocker, click Start (the Windows icon in the bottom left of your computer), search for bitlocker, and open Manage BitLocker. If your version of Windows supports it, the window should show whether BitLocker is enabled on your C: system drive, and you should have the option to enable it. If so, do that now.
When you enable BitLocker, it makes you save a recovery key to either your Microsoft account, a file on a nonencrypted USB disk, or a printed document. Saving your recovery key to your Microsoft account is the simplest option, but it does mean that Microsoft or anyone with access to your Microsoft account can access the key needed to unlock your disk. If you’d prefer to not give Microsoft this access, print the recovery key. You should also save your key in your password manager. If your computer breaks, you’ll need your recovery key to access any of the data on your encrypted disk.
Device Encryption
If your version of Windows doesn’t include BitLocker, try device encryption. Click Start, then navigate to Settings ▸ Update & Security (or Privacy & Security, depending on your Windows version). Then go to the Device encryption tab to check whether it’s enabled; if not, enable it.
If you see no Device encryption tab, your PC doesn’t support device encryption, unfortunately. You have a few options. The easiest option is to upgrade to the Pro version of Windows, which typically costs about $100, and then use BitLocker. Alternatively, use VeraCrypt.
VeraCrypt
VeraCrypt is free and open source disk encryption software. To begin, download VeraCrypt from https://veracrypt.fr, install it on your computer, and open it.
Click Create Volume to open the VeraCrypt Volume Creation Wizard. VeraCrypt lets you choose from three types of encrypted volumes. Select Encrypt the System Partition or Entire System Drive and click Next.
On the Type of System Encryption page, choose Normal and click Next. On the Area to Encrypt page, choose Encrypt the Windows System Partition and click Next. On the Number of Operating Systems page, choose Single-Boot and click Next (unless you have multiple operating systems on your computer, in which case choose Multi-boot). On the Encryption Options page, use the default settings and click Next.
The next page is the Password page. You’ll need to come up with a strong passphrase that you’ll have to enter each time you boot up Windows. If that passphrase is weak, your disk encryption will be weak. I recommend generating a strong passphrase and saving it in your password manager—this way, if you forget it the next time you reboot your computer, you can look it up in your password manager on your phone. Enter the passphrase twice and click Next.
The next page is called Collecting Random Data. VeraCrypt includes a feature where you move your mouse around the window randomly so that it can collect information from your mouse movements to make the encryption more secure. Move your mouse around until the bar at the bottom of the screen is green, and then click Next. Click Next again on the Keys Generated page.
The Rescue Disk page prompts you to create a VeraCrypt Rescue Disk, which you can use in the event that your disk gets damaged and you have issues booting Windows. Creating a rescue disk is outside the scope of this book, so check Skip Rescue Disk Verification and click Next. On the Rescue Disk Created page, click Next again.
On the Wipe Mode page, select None (Fastest) as the Wipe mode and click Next. On the System Encryption Pretest page, click Test to test that disk encryption will work properly on your computer—this will reboot your computer, and you’ll need to enter your VeraCrypt passphrase to boot up.
When you reboot your computer, it should boot up to the VeraCrypt bootloader, and you’ll need to enter the VeraCrypt passphrase to proceed. Under PIM, just press ENTER. If all goes well, it will succeed, Windows will boot up, and VeraCrypt will open on the Pretest Completed page again after you log in. Click Encrypt to begin encrypting your internal disk with VeraCrypt. From now on, you’ll need to enter your VeraCrypt passphrase each time you boot your computer, but all of your data will also be protected with this passphrase.
macOS
Apple’s disk encryption technology is called FileVault. If you’re using macOS Ventura or newer, open the System Settings app, click Privacy & Security on the left, and scroll down to the FileVault section. (If you’re using a version of macOS older than Ventura, open the System Preferences app, click Security & Privacy, and make sure you’re on the FileVault tab.) If FileVault is turned off, turn it on.
The password that unlocks your Mac’s disk is the password you use to log in to your account. Make sure your Mac password is strong; if it’s weak, your disk encryption is weak.
When you enable FileVault, it makes you save a recovery key. Save that key in your password manager. If you forget your Mac password, you’ll need the recovery key to access any of your data. If you’re using a local password manager that doesn’t sync to the cloud, like KeePassXC, store a copy of your recovery key somewhere else as well, such as on a piece of paper kept in a secure location.
Linux
Linux uses technology called LUKS for disk encryption. You can check the Disks program (in most versions of Linux, to open this program, press the Windows key, type disks, and press ENTER) to see whether your internal disk is encrypted. The program shows you all of the disks attached to your computer and allows you to format them (see Figure 1-3. If your internal disk has an unlocked partition with LUKS encryption, disk encryption is enabled.
In this case, my internal disk is the 500GB Samsung SSD listed on the left in Figure 1-3. My disk is partitioned into four parts, and the last part (Partition 4) is 499GB and is encrypted with LUKS. Your disk might look different from mine, but you’ll know it’s encrypted if the main partition says LUKS.
Unfortunately, you can’t just turn LUKS on or off. If your disk isn’t encrypted, the only way to encrypt it is to reinstall Linux, this time making sure to encrypt the disk. When you’re installing Linux, one of the first steps in the installation process will be to partition your disk; make sure to enable encryption during that step. If you’re going to reinstall Linux, always back up your data first. After choosing your encryption passphrase, save a copy of it in your password manager; you’ll need it every time you boot up your computer.
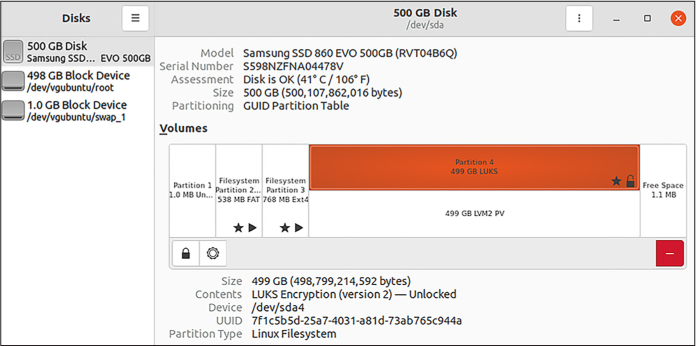
Figure 1-3: Managing disks and partitions using Disks in Linux
Exercise 1-2: Encrypt a USB Disk
Your internal disk alone likely isn’t large enough to store all of the datasets you’ll need to work with. As mentioned in the book’s introduction, in order to complete the exercises in this book and work with the massive datasets, you need a USB disk that’s at least 1TB. To encrypt that USB disk, you also need to format it, which deletes any data already on it. This exercise shows you how to do that for whichever operating system you’re using.
Before you get started, let’s go over some background on how mass storage devices (like hard disks, SD cards, and so on) work. Storage devices are typically split into one or more partitions, also called volumes, with each partition using a format called a filesystem. You can think of partitions as cabinets that use different shelving systems (filesystems) to organize data. Different operating systems use different filesystems. Windows often uses a filesystem called NTFS, macOS often uses APFS, and Linux often uses ext4. There are also filesystems that all three operating systems can use, such as ExFAT.
When you erase a storage device, you delete all of the partitions on it so that it contains unallocated space. You can then create a new partition—with USB disks, you’ll typically create a single partition that takes up all of the unallocated space—and format it using the filesystem that matches your operating system.
Whether you’re working in Windows, macOS, or Linux, begin by plugging your USB disk into your computer. Open your password manager and save a new strong passphrase, created using your password manager’s password generator. Name the password something like datasets USB disk encryption.
To begin encrypting your disk, skip to the appropriate subsection for your operating system.
Windows
Windows users with BitLocker should work through the following subsection; if you don’t have BitLocker, skip to the VeraCrypt section.
BitLocker
If you have a Windows computer with BitLocker, use that to encrypt your USB. First, make sure to format the USB disk as NTFS. To do so, click Start, search for disk management, and open Create and Format Hard Disk Partitions. This opens the Windows Disk Management app, as shown in Figure 1-4, which lists all of the disks connected to the PC and lets you format them.
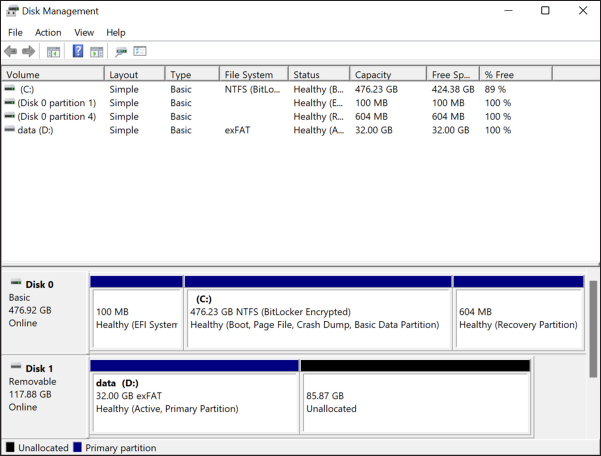
Figure 1-4: The Disk Management app in Windows
The bottom part of the window shows each disk attached to your computer and how they’re separated into partitions. Disk 0 is my internal hard disk (as you can see, one of the partitions is C:), and Disk 1 is a USB disk (one of those partitions is D:). On my computer, Disk 1 has a single 32GB partition, as well as about 86GB of unallocated space.
Find the USB disk you need to format. Right-click on every partition and choose Delete Volume until you’ve deleted all the partitions on the disk. Then right-click on the unallocated space in your disk and choose New Simple Volume, which should open a wizard to help you create the volume. Choose the full amount of disk space and format it as NTFS. The wizard will ask you for a volume label, which is just a name for your partition; in Figure 1-4, the label for D: is data. I recommend calling this disk datasets.
Once the disk is formatted, click Start, search for bitlocker, and open Manage BitLocker. You should now see your USB disk and have the option to turn on BitLocker. When you enable BitLocker on your USB disk, a window should pop up asking how you would like to unlock this drive. Choose Use a Password to Unlock the Drive, then copy and paste your USB disk encryption passphrase from your password manager into the password field. You’ll need to paste it into the field to re-enter the password as well. When you enable BitLocker, you’ll be required to save a recovery key to a file. Since you’re saving the passphrase in a password manager, however, you don’t need your recovery key, and you can delete the file.
VeraCrypt
If you use Windows Home and don’t have BitLocker available on your computer, use VeraCrypt to encrypt your USB disk.
If you don’t already have VeraCrypt, download it from https://veracrypt.fr, install it on your computer, and open it. Click Create Volume to open the VeraCrypt Volume Creation Wizard. On the first page of the wizard, VeraCrypt lets you choose from three types of encrypted volumes. Select Encrypt a Non-system Partition/Drive and click Next.
On the Volume Type page, VeraCrypt asks if you want a standard volume or a hidden one. Select Standard VeraCrypt Volume and click Next. On the Volume Location page, click Select Device, choose the USB disk you want to encrypt, and click Next. On the Volume Creation Mode page, select Create Encrypted Volume and Format It and click Next. On the Encryption Options page, use the default settings and click Next. You can’t do anything on the Volume Size page, since you’re encrypting a whole partition rather than creating an encrypted file container, so just click Next.
On the Volume Password page, copy and paste your USB disk encryption passphrase from your password manager into the Password field, and paste it again into the Confirm field. Then click Next. On the Large Files page, VeraCrypt asks if you intend to store files larger than 4GB in your VeraCrypt volume. Select Yes and click Next. On the Volume Format page, under the Filesystem drop-down menu, select exFAT and check the box next to Quick Format. VeraCrypt also includes a feature where you move your mouse around the window randomly so that it can collect information from your mouse movements to make the encryption more secure. Move your mouse around until the bar at the bottom of the screen is green, and then click Format.
A window should pop up, warning you that all of the data on your USB disk will be erased and asking if you’re sure you want to proceed. Click Yes, and then wait while VeraCrypt creates an encrypted partition on your USB disk. As long as you selected Quick Format on the previous page, this should only take a few seconds. On the Volume Created page, click Exit to exit the wizard and get back to the main VeraCrypt window.
After you encrypt a USB disk with VeraCrypt, you need to use VeraCrypt to mount it, or make it available on your computer as a drive letter. In the main VeraCrypt window, select an available drive letter (such as F:), click Select Device, select your VeraCrypt-encrypted USB disk, and click OK, then Mount. After you provide the encryption passphrase to unlock it, VeraCrypt will mount your encrypted USB disk so you can use it. Now any files that you save to this drive will be stored encrypted on disk.
Before unplugging your USB disk, unmount it by selecting the drive letter in VeraCrypt and clicking Dismount.
NOTE VeraCrypt also comes in handy if you need to access the same encrypted disk across operating systems—for example, if you need to use it on both a Windows PC and a Mac. However, for the purposes of this book, only Windows users who don’t have BitLocker should use VeraCrypt. In general, you’ll have fewer headaches if you stick with the disk encryption software built into your operating system.
macOS
Open the Disk Utility app, which you can find in the Applications/Utilities folder. This app lists all of the disks attached to your computer and lets you format them.
In Disk Utility, select the USB disk you plugged in and click the Erase button. Name the disk datasets and choose APFS (Encrypted) for format. You will then be prompted for the password to unlock the encrypted disk. Copy and paste the USB disk encryption passphrase that you created at the beginning of this exercise from your password manager into Disk Utility. Disk Utility will also prompt you for a password hint, but because you’re saving this passphrase in your password manager and not bothering to memorize it anyway, you can leave the password hint blank.
Linux
Open the Disks app as you did in Exercise 1-1. Select your USB disk in the list of disks on the left, then click the menu button and choose Format Disk. This will delete all of the data on the USB.
Click the + button to add a new partition and set the partition size to the largest option. Name your disk datasets, choose Internal Disk for Use with Linux Systems Only, and check the box Password Protect Volume (LUKS). It will prompt you to enter a password. Copy and paste the USB disk encryption passphrase that you created at the beginning of this exercise from your password manager into Disks.
Protecting Yourself from Malicious Documents
Before you start working with any datasets on your encrypted USB disk, you should know how to protect yourself from any potentially malicious documents they may contain.
Have you ever been told to avoid opening email attachments from unknown senders? This is solid computer security advice, but unfortunately for researchers, journalists, activists, and many other people, it’s impossible to follow. In these lines of work, it’s often your job to open documents from strangers, including leaked or hacked datasets.
Opening documents you don’t trust is dangerous because it may allow others to hack your computer. PDFs and Microsoft Office or LibreOffice documents are incredibly complex. They can be made to automatically load an image from a remote server, tracking when a document is opened and from what IP address. They can contain JavaScript or macros that, depending on how your software is configured, could automatically execute code when opened, potentially taking over your computer. And like all software, the programs you use to open documents, like Microsoft Office and Adobe Reader, have bugs, which can sometimes be exploited to take over your computer.
This is exactly what Russian military intelligence did during the 2016 US election, for example. First, the Main Directorate of the General Staff of the Armed Forces of the Russian Federation (GRU) hacked a US election vendor known as VR Systems and got its client list of election workers in swing states. It then sent 122 email messages to VR Systems’ clients from the email address vrelections@gmail.com, with the attachment New EViD User Guides.docm. If any of the election workers who got this email opened the attachment using a vulnerable version of Microsoft Word in Windows, the malware would have created a backdoor into their computer for the Russian hackers. (We don’t know for sure whether any of the targets opened the malicious attachment.)
Sending malicious email to specific targets in this way as part of a hacking operation is called spearphishing. Figure 1-5 shows a spearphishing email message targeting an election worker in North Carolina, which The Intercept obtained using a public records request.
In 2017, Reality Winner leaked a classified document describing this spearphishing attack to The Intercept. Thanks to her whistleblowing, the public knows considerably more about Russia’s attacks on the US election in 2016 than it otherwise would. In fact, US states like North Carolina learned that they were under attack by Russian hackers only by reading The Intercept. In 2022, two former election officials told 60 Minutes that Reality Winner’s disclosure helped secure the 2018 midterm elections against similar hacking attempts.
To make it safer to open untrusted documents, I developed an open source app called Dangerzone. When you open an untrusted document in Dangerzone, the app converts it into a known-safe PDF—one that you can be confident is safe. Using technology called Linux containers—which are like quick, small, self-contained Linux computers running inside your normal computer—it converts the original document into a PDF if it’s not already one, splits the PDF into different pages, and converts each page into raw pixel data. Then, in another Linux container, it converts the pixel data back into a PDF. You can also ask Dangerzone to use optical character recognition (OCR) technology—software that looks at an image of text and figures out what the characters are—to add a text layer back to the PDF so you can still search the text.
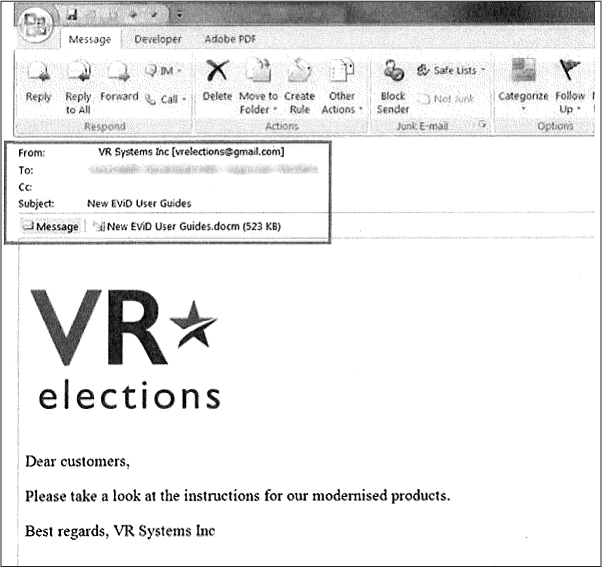
Figure 1-5: A spearphishing email targeting an election worker
Dangerzone is essentially the digital equivalent of printing out a document and rescanning it, stripping anything malicious from it, and removing the original document’s digital metadata. If you opened the malicious New EViD User Guides.docm document using Dangerzone, it would create a new document called New EViD User Guides-safe.pdf. You could then safely open this PDF without risk. As an added benefit, you don’t need internet access to use Dangerzone, so it works well on air-gapped computers.
You’ll learn more about Dangerzone and Linux containers in Chapter 5, which covers how to make datasets searchable. In the meantime, Exercise 1-3 will show you how to get started with it.
Exercise 1-3: Install and Use Dangerzone
In this exercise, you’ll install Dangerzone and use it to convert documents into known-safe versions. Figure 1-6 shows a screenshot of Dangerzone in action—in this case, converting the untrusted document D&D 5e - Players Handbook.pdf to a known-safe version called D&D 5e - Players Handbook-safe .pdf, which is also OCR’d and searchable.
Figure 1-6: Dangerzone in action
Download and install Dangerzone from https://dangerzone.rocks. The app relies on Linux containers. If you’re working on a Windows or macOS machine, the easiest way to get containers running is to use software called Docker Desktop, which you’ll be prompted to install the first time you open Dangerzone. (You don’t need to do anything with Docker Desktop for now; simply install and open it. You’ll learn more about Docker in Chapter 5.)
Now that Dangerzone is installed, try it out. Open any PDF, Microsoft Office document, LibreOffice document, or image on your computer in Dangerzone and convert it to a safe PDF. If someone attaches a document to an email and you don’t trust it, download a copy of it first, open Dangerzone, and click Select Suspicious Documents. Then browse for the document you downloaded and use Dangerzone to convert it into a known-safe version.
VIRTUAL MACHINES
Another option, which is a bit more complicated, is setting up a virtual machine (VM). VMs are like a stronger version of Linux containers. They isolate the software running inside the VM more than Linux containers can, and they can run on any operating system. If you choose this option, make sure to disable internet access in your VM before opening documents. This way, if the document is malicious, it won’t let any attackers know the document was opened.
Giving detailed instructions on using VMs is outside the scope of this book. However, if you want to try them on your own, the easiest way to get started is to use the free and open source virtualization software VirtualBox (https://www.virtualbox.org). VirtualBox works for Intel-based Macs, Linux, and Windows computers. At the time of writing, there’s a beta version of VirtualBox that supports Apple Silicon Macs, but it has issues. If you have an Apple Silicon Mac, UTM (https://mac.getutm.app) is a good choice. It’s free and open source, and you can find detailed instructions for installing different operating systems at https://docs.getutm.app/guides/guides/. If you’d like something a bit easier, I recommend you try Parallels (https://www.parallels.com) or VMware Fusion (https://www.vmware.com/products/fusion.html) instead; note, however, that neither is free.
Dangerzone works great with PDFs and Word documents, but not so great with spreadsheets. No matter what type of file you open in Dangerzone, you always end up with a safe PDF, and spreadsheets really aren’t meant to be read in that format.
If Dangerzone doesn’t do a good enough job with a document you’d like to read, you can open it a few other ways while containing the damage. If you don’t believe the document is sensitive, upload it to Google Drive and open it there, using Google’s web interface. This way, technically Google is opening the malicious document on its computers instead of you opening it on yours.
Summary
In this chapter, you’ve learned how to think about source protection in today’s world of widespread digital surveillance. You’ve also learned about securely storing datasets, depending on their sensitivity; verifying that your datasets are authentic; and redacting information from documents before you publish your final report. You started using a password manager to keep your passwords safe, and you encrypted your internal disk and set up your encrypted datasets USB disk. Finally, you practiced turning potentially malicious documents into ones you know are safe to open using Dangerzone.
In the next chapter, you’ll put your datasets disk to good use by downloading your first hacked dataset.